This webpart is part of the Percy Web Parts app which is included in the Percy site templates. If you do not see this webpart, add the Percy Web Parts app to your site.
Setting up a list
For the webpart to work, you need to create a list in the site that will hold the Spotlight. This list needs to have the following columns:
- Nominator - Person or Group
- Nominee - Person or Group (note: if you want to be able to nominate multiple people in the same nomination, you can tick the "Allow multiple selections" option)
- Category - Choice (add the categories you want people to be nominated for)
- Message - Multiple lines of text
- LikedBy - Person or Group (you will need to create this column without spaces in the name at first. Once created, you can rename it to "Liked By" with spaces. You will also need to go into the column settings and ensure "Allow multiple selections" is ticked)
Setting up the webpart
Add the Spotlight webpart to your page:
Once added, for the Absolute Site URL, put the link to the site that the list will sit in, type in the name of the list in the List Name box, then configure the rest of the options as you see fit. These options currently include:
- Choose whether categories are displayed, what heading is displayed above the category
- Set a character limit. If a message exceeds the character limit, a Read More button will appear
- Choose whether likes and comments are displayed, these display as buttons beneath the message
- Choose how many entries are displayed, whether they automatically change, and if so how long they are displayed for
If the list wasn't set up correctly, the webpart will appear to be stuck loading. If the webpart has been set up correctly, it should show up with the below error message if there are no existing entries:

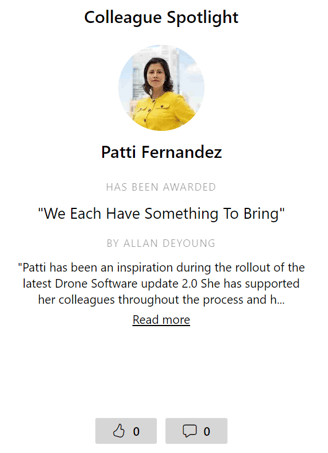
Once entries are added to the list, it should then show the nominations like so:
Submitting Nominations
As long as data is added to the list, the Spotlight will show nominations. When new entries are submit, they need to at least incluse a Nominee, Nominator, and a category. A few methods to add data include:
- Adding items to the list directly. If you click "New" whilst in the list, a menu should appear with the below options at the top. You can copy the link and add it somewhere to make it easy, such as a Link Tile

- Creating a form in Microsoft Forms that's connected to the list via a Power Automate flow
- You can also now create a form directly from the list, meaning responces will automatically go into the list
- Creating a Power App connected to the list via a Power Automate flow
Note: depending on how you want nominations to be submit, you may need to make sure people submitting nominations have at least Edit permissions to the list.